Alligator Hide Care
The rugged hide of the alligator is used to make some of the most elegant and expensive leather products in the world. Quality is a must to any customer willing to buy alligator products that cost several hundred to several thousand dollars each. A commitment to quality must start with the trappers who harvest the alligator and must be shared by the helpers and processors who skin the hides.
History
Much has changed in the leather markets since the 1930s when E.A. McIlhenny described how trappers, who were not paid any more for a 12-foot skin than for a 7-foot skin, would cut the larger hide into two.
It was common practice even into the early 1980s for buyers to round down the length of alligator hides to the nearest foot if the extra inches didn't total at least 6, and in some instances 10 inches. Today, buyers pay to the inch, and the importance of increasing the quality of salted alligator hides can't be stressed too much.
"In other words—if a hunter kills a 12-foot alligator he cuts the skin so as to get two 7-foot pieces from the one by cutting the skin in a diagonal manner from a point forward of the front leg to such a point on the tail that it will net him 7-foot pieces, and the buyer pays full price for two 7-foot skins." —E.A. McIlhenny
Hide Care Tips
Most quality problems with Louisiana alligator hides can be cured by simply using extra care with the skinning knife and extra effort with the hide scraper. Be sure to use the right tools and follow the proper skinning steps.
Remember, proper care of alligator hides begins as soon as the animal is harvested.
- Skin the alligator as soon after the harvest as practical.
- Avoid direct sun or heat on the carcass or hide.
- Keep the hide away from blood, entrails, or other dirty surfaces where to prevent bacteria from getting into the hide.
The Right Tools:
- Salt
- Scraper
- Good light
- Knife and sharpener
- Steady table at a comfortable height
Skinning Steps
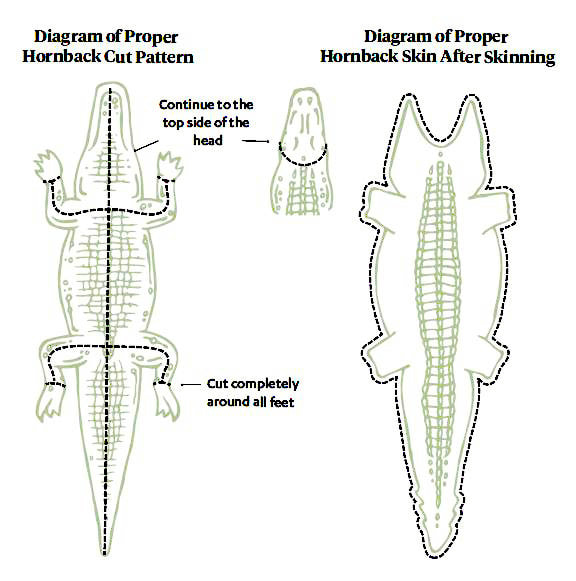
- Outline where on the body skinning will start.
- Make a cut along the sides between the first and second rows of scutes on the back.
- Make a straight cut from the back along the top of each leg (through the largest scales).
- Cut completely around each foot at the wrist or ankle.
- Make an outline cut on the tail below the top row of tail scutes.
- When you reach the single row of tail scutes midway along tail, cut through the base to the end of the tail (butterfly end of tail).
- Skin the tail completely along the sides.
- Begin skinning the body section with the front legs and adjacent side skin.
- Slowly cut the hide away from the front legs and side of body.
- Some pulling can be done on the upper leg portions.
- Skin the hind legs and adjacent side skin the same as the front legs.
- The sides should be completely skinned and only the belly portion should be left unskinned at this point.
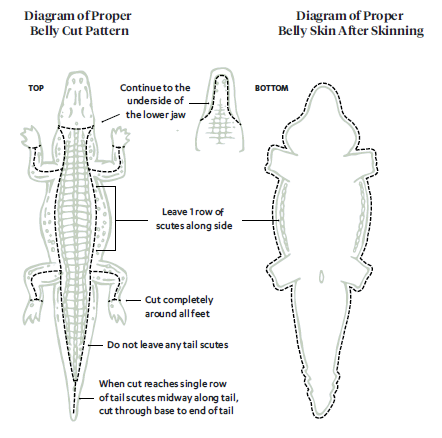
- After the sides and legs are skinned, turn the alligator on its side and make outline cuts along the lower jawbone.
- Make a cut along the outer edge of the lower jaw skin.
- Pull on the jaw muscle to tighten the flesh, allowing for easier skinning.
- After the hide is cut from the lower jaw and neck, the alligator is ready to be skinned down the belly.
- Skin the underside of the alligator by both pulling and cutting. Pulling is easier on small alligators, with careful cutting required otherwise.
- Cut carefully around the anal opening (vent) so this area won't tear if pulled.
- Both pull and cut the hide from the remaining tail section.
- Meat and fat remaining on the hide must be removed. Scrape with dull objects (blunt knives, beveled pipes, paint scrapers, spoons, etc.), taking care not to cut or tear the hide. Removing meat and fat from the hide is very important. It often takes several months to store and ship alligator hides overseas for tanning. Excess meat and fat can degrade the hide during this process. Excess meat supports bacterial growth and can lead to "red heat" or " slipping" scales. Excess fat can prevent salt from properly penetrating the hide, and if the fat heats up, it can penetrate the hide and leave grease spots on the finished leather.
- Once scraped, the hide should be relatively free of flesh and white in appearance.
- The hide should be washed in clean, fresh water to remove blood and other fluids.
- Hang the hide in a shaded area and allow it to drain.
Curing
Take Special Care: If you notice any "red heat" or "slipping scales" in your lot, separate those hides from the rest of the hides and treat them in a “slip dip” solution:
- Mix a half gallon of bleach in 25 gallons of water and add half a regular size box (about one pound) of both Tide and Borax.
- Discard the salt in an affected hide. (Red heat in particular can spread from one hide to the next).
- Submerge the hides in the dip for about 15 minutes.
- Drain the hides and liberally resalt them.
- Re-roll the hides and if possible, store dipped hides away from other hides.
Curing alligator hides removes moisture from the hides so they can be better preserved before tanning.
Method 1: Salting
A fine grain mixing salt works best and is the preferred method of curing alligator hides. Salt should be applied generously (1/2 to 1-inch thick) and rubbed thoroughly into all parts of the hide, making sure enough salt gets into the creases, flaps, tail, and similar places where bacteria can grow. Salt helps slow bacterial growth. Tightly roll the hides and stack in a well-ventilated place where they can drain. After three to five days in a cool or shaded place, the hides should be resalted for best curing. Don't use rock salt and don't freeze hides (freezer burned hides won't tan properly).
Method 2: Brining
If done correctly, a brine solution for both curing and storing alligator hides is an acceptable way to handle them. But you must pay close attention to keep the brine saturated with salt, and check the hides frequently to ensure proper curing.
Ingredients
- 50-gallon covered plastic drum
- 50 pounds of salt
- 1 pound of 20 Mule Team Borax (boric acid)
- 1 pint of bleach
- 25 gallons of water
For brine solutions to be effective, they must be carefully prepared and maintained. Use a plastic or other non-corrosive covered container of sufficient size. Heavy, 50-gallon plastic drums used for shipping olives, peppers, or pickles are best, but large, plastic, covered garbage cans are good substitutes. The brine solution must remain saturated with salt. Too little salt in solution will cause the loss of hides. Fill container half full of water, add salt, borax, and bleach, and mix thoroughly. After complete mixing, a 2- or 3-inch layer of salt should remain on the bottom. The bleach and borax will assist in keeping bacterial growth to a minimum.
Alligator hides are sensitive to many chemicals which may affect the tanning process. When it comes to chemicals, more is not better. Do not add formaldehyde or other chemicals which may affect the hide.
Hides should be properly scraped and salted with a 1-inch layer of salt, tightly rolled, and secured with a rubber band prior to placing in brine. When submerging a hide in the brine, rotate it to allow most of the air pockets to escape. If properly salted, the layer of salt in the rolled hide will act as a wick to draw the brine solution throughout the hide. All hides should be entirely submerged in the brine at all times. Each time a hide is added to the brine, sprinkle a few pounds of salt over the top. This is important to maintain the saturated solution.
Keep the brine container tightly covered to keep insects and airborne contaminants from entering. When hides are to be delivered for sale, they must be removed from the brine and entirely resalted prior to being shipped or placed in refrigeration.